
Create a Telegram Bot Step by Step (With a Working Reply)
· 4 min read · 18+ readers

This tutorial takes you from nothing to a bot that replies to /start. You need a  Telegram account and either Node.js 18 or newer or Python 3. We use plain HTTP calls so you can see what happens, and mention libraries at the end. A related non-technical overview is how to create a bot with BotFather.
Step 1: Make the bot
Open @BotFather, send /newbot, choose a name and a username ending in bot. Copy the token it gives you. It looks like 123456789:AAH.... Treat it like a password. See keeping your token safe.
Put the token in an environment variable, not in your source code:
export BOT_TOKEN="123456789:your-token-here"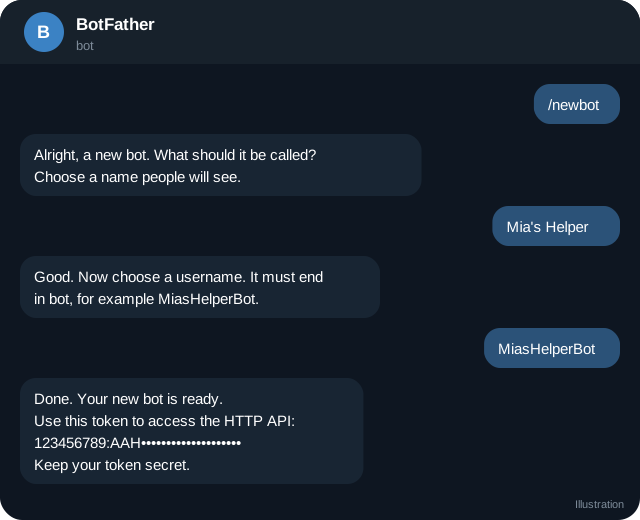
Step 2: Check the token
Every Bot API call goes to https://api.telegram.org/bot<TOKEN>/METHOD. The simplest method is getMe:
curl "https://api.telegram.org/bot$BOT_TOKEN/getMe"You should get JSON with "ok": true and your bot's username. If you get 401 Unauthorized, the token is wrong.
Step 3: Send yourself a message
Open your bot in Telegram and press Start. The bot cannot message you until you have done that. Then ask Telegram for the pending updates:
curl "https://api.telegram.org/bot$BOT_TOKEN/getUpdates"Find message.chat.id in the result. That number identifies your chat. Send a message:
curl -X POST "https://api.telegram.org/bot$BOT_TOKEN/sendMessage" \
  -d chat_id=YOUR_CHAT_ID -d text="Hello from my bot"
Step 4: A tiny bot that replies
Here is a long polling loop in Node.js (18+ has fetch built in). Long polling means your program asks Telegram for new updates in a loop.
const token = process.env.BOT_TOKEN;
const api = (m, body) => fetch(`https://api.telegram.org/bot${token}/${m}`, {
  method: "POST", headers: { "content-type": "application/json" }, body: JSON.stringify(body),
}).then(r => r.json());

let offset = 0;
while (true) {
  const r = await api("getUpdates", { offset, timeout: 30 });
  for (const u of r.result ?? []) {
    offset = u.update_id + 1;
    const text = u.message?.text;
    if (text === "/start") await api("sendMessage", { chat_id: u.message.chat.id, text: "Hi! I am alive." });
  }
}
Save as bot.mjs and run node bot.mjs. Message the bot /start and you should get a reply. The offset tells Telegram which updates you have already handled.
Step 5: Make it presentable
Set a description, about text, picture and commands. See setting description, commands and photo.
Step 6: Choose how to receive updates
Polling is easiest for development. For production, many people prefer a webhook, where Telegram sends each update to your HTTPS address. Read webhook vs long polling before you decide. You cannot use both at once: while a webhook is set, getUpdates returns an error.
Step 7: Use a library when it grows
Raw HTTP is fine for learning. Libraries save time with routing, retries and types. Popular options include grammY and node-telegram-bot-api for JavaScript and TypeScript, and python-telegram-bot and aiogram for Python. Pick one that is actively maintained, and read its documentation for current syntax. We do not show library code here because APIs change between versions.
Step 8: Test like a stranger
Use a second Telegram account to open the bot and press Start. See testing with a second account.
Common mistakes
- Running two copies of the bot with polling. Telegram returns 409 Conflict. See common errors.
- Forgetting that bots cannot start chats with users who never pressed Start.
- Committing the token to a public repository.
- Not handling errors: log them.
Quick checklist
- Bot created in the verified BotFather and the token stored in an environment variable.
- getMe returns ok true for your token.
- You pressed Start so the bot may message you.
- The polling loop advances offset after each update.
- Only one copy of the bot is running.
- Description, about text and commands are set.
- A second account has tested the start flow.
- A plan exists for moving to a webhook and hosting.
Where to go next
Once the bot replies, add one feature at a time. A menu with buttons comes first, then a way to reach you, then anything that stores data or takes payments. Read the Bot API reference for each new method you use, and keep your library version pinned so that an update does not change behaviour under you. Write down how to deploy and how to rotate the token so that you are never stuck during an incident.
Frequently asked questions
Do I need a server?
For development, your own computer is enough. For a bot that stays online, see hosting a bot cheaply.
Which language should I use?
Any language that can make HTTPS requests. Choose what you know.
Can the bot read all my messages?
Only messages sent to the bot, or in chats it has been added to, subject to privacy mode.
How do I stop the loop?
Press Ctrl+C. Updates you did not confirm with a higher offset will arrive again next time.
Related guides
BotFather Commands: What Each One Does
A reference to BotFather, Telegram's tool for creating and managing bots: the main commands, settings menus, what they change and what to watch out for.
Telegram Bot API Basics: Methods, Updates and Responses
How the Telegram Bot API works: URL format, JSON responses, update objects, common methods, parse modes, keyboards and how to read errors.

Webhook vs Long Polling for Telegram Bots
Compare getUpdates long polling and setWebhook for Telegram bots: how each works, trade-offs, limits, when to switch and how to migrate safely.
Keep Your Telegram Bot Token Safe (and What to Do if It Leaks)
A bot token is a password. Learn where tokens leak, how to store them, how to rotate with /revoke, how to detect misuse and a leak response checklist.
Test Your Telegram Bot with a Second Account
A practical testing routine for Telegram bots: second accounts, a dev bot, test groups, payment tests, Telegram's test environment and a pre-launch checklist.
A Telegram Webhook on AWS Lambda or a Small Server
Two ways to receive Telegram updates: an AWS Lambda function URL and a tiny Node server behind HTTPS, with secret token checks, fast replies and queues.
More in Build on Telegram
- Add a Bot as Channel Admin and Post to Your Channel
- Bot Privacy Mode and Group Admin Rights Explained
- Common Telegram Bot Errors and How to Fix Them
- Connect a Bot to Your Telegram Business Account (Chatbot Mode)
All topics: Build on Telegram · Guide index · Explore Telegram · About TSocial